Automating KPI Review Reminders Using Power Automate and SharePoint
 Rajiv KumarSeptember 18, 20267 min read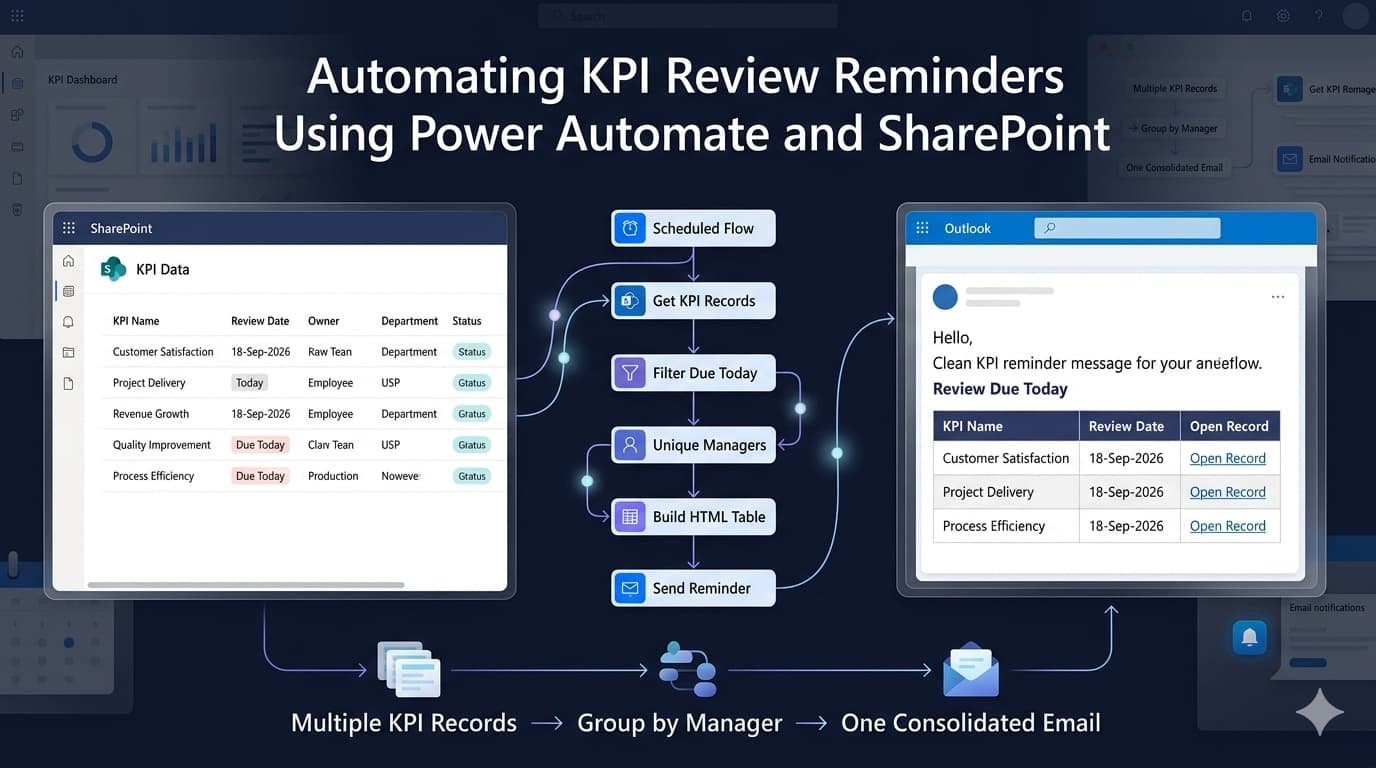
In many organizations, senior employees, department heads, managers, or other employees with defined Key Performance Indicators (KPIs) are required to periodically update their KPI records.
How to Build a Daily KPI Reminder Flow with a Consolidated HTML Email
A typical KPI process may contain information such as:
KPI Name
Review Date
Target
Achievement
Department
KPI Owner / Manager
KPI Status
Remarks
Record link for updating the KPI
The challenge starts when the organization has a large number of KPI records.
HR or the Continuous Improvement team may have to manually check:
Which employees have KPI reviews due today?
Then they have to send reminders to the respective employees.
If this process is performed manually every day, it becomes repetitive, error-prone, and unnecessarily time-consuming.
This is where Microsoft Power Automate can help.
In this solution, a scheduled Power Automate flow checks KPI records every day and automatically sends a reminder only to users whose KPI review date matches the current date.
Even better, if one user has multiple KPI records due on the same day, the flow combines those records into one consolidated HTML table instead of sending multiple emails.
The Business Requirement
Consider an organization where employees or managers are responsible for different KPIs.
A person can potentially have multiple KPI records because they may be responsible for:
Multiple KPIs
Multiple departments
Multiple business areas
Different yearly objectives
For example:
KPI Name | Review Date | Owner |
|---|---|---|
KPI 1 | 18-Sep-2026 | User A |
KPI 4 | 18-Sep-2026 | User A |
KPI 7 | 25-Sep-2026 | User B |
The requirement is:
Run the automation every day.
Retrieve KPI records from SharePoint.
Identify records whose review date is today.
Group those records by KPI owner/manager.
If a user has multiple KPI records due today, combine them.
Generate an HTML table.
Add a direct link to each KPI record.
Send one reminder email to the respective user.
Do not send an email when there are no KPI records due for that user.
The resulting email can look like this:
KPI Name | Review Date | Open Link
KPI 1 | 18-Sep-2026 | Open Record
KPI 4 | 18-Sep-2026 | Open Record
This gives the recipient everything required to complete the update without searching through SharePoint manually.
Solution Architecture
The overall flow can be understood as the following sequence:
Recurrence
│
├── FormatDate
│
├── Get items
│
├── Select ManagerNames
│
├── Compose UniqueManagers
│
└── Apply to each Unique Manager
      │
      ├── Filter ManagerRecords
      │
      ├── Select EmailTableColumns
      │
      ├── Compose Table CSS
      │
      ├── Create HTML table
      │
      ├── Compose Clean HTML Table
      │
      ├── Search for users (V2)
      │
      ├── Compose ManagerEmail
      │
      └── Condition
             │
             ├── Yes
             │    └── Send an email (V2)
             │
             └── No
                  └── No action

      ↓

Terminate
The uploaded production flow follows this overall structure.
SharePoint List Structure
Before creating the flow, create a SharePoint list containing the KPI information.
A simplified structure could look like this:
Column | Purpose |
|---|---|
KPI Name | Name or identifier of the KPI |
Review Date | Date on which the KPI needs to be updated |
KPI Owner / Manager | Person responsible for the KPI |
Target | Expected target |
Achievement | Actual achievement |
Status | Current KPI status |
Record Link | Link to the SharePoint item |
The exact columns can vary depending on the organization's KPI structure.
For this automation, the most important fields are:
KPI Name
Review Date
Manager / KPI Owner
Record URL
Step 1: Create the Scheduled Flow
Create a Scheduled cloud flow in Power Automate.
Use the Recurrence trigger.
Configure it to run once every day.
For example:
Example
Frequency: Day
Interval: 1
Time zone:
At these hours:
At these minutes:
The production implementation uses a daily recurrence trigger.
The purpose of this trigger is simple:
Every day, automatically check whether any KPI reviews are due.
There is no requirement for HR or an administrator to manually execute the flow.
Step 2: Calculate the Current Date
After the Recurrence trigger, add a Compose action.
Give it a meaningful name such as:
FormatDate
formatDateTime(
    convertTimeZone(
        utcNow(),
        'UTC',
        'Arabian Standard Time'
    ),
    'dd-MMM-yyyy'
)
The purpose of this action is to generate the current date in the same format used for comparison with the SharePoint Review Date.
Step 3: Get KPI Records from SharePoint
Add the Get items action.
Configure:
Get items.
Site Address:Select the SharePoint site containing the KPI list.
List Name:Select the KPI list.
Filter Query: field_1 eq 'DGEP' and KPIReviewDate eq '@{outputs('FormatDate')}'
The Get items action retrieves records from the KPI SharePoint list before the flow starts grouping them by manager.
At this point, the flow has the complete KPI dataset available for processing.
Note("field_1" is choice column that's why we take sharepoint internal name and display name is "Category" to put in filter query
Step 4: Extract Manager Names
The next requirement is to determine which managers/users exist in the retrieved KPI data.
Add a Select action.
Rename it:Select ManagerNames
SELECT MANAGERNAMES
From:
Output('Get_Items')?['body/value']Map:
item()?['fileds_117']Note: "fileds_117" is the internal name of sharepoint column of Manager Name
Use the KPI records returned by Get items as the input.
Map the manager/KPI owner field into the output.
Conceptually:
Get items
    ↓
Select ManagerNames
    ↓
Manager Name
Manager Name
Manager Name
Manager Name
There can be duplicate manager names because one person may own multiple KPI records.
For example:
Rajiv
Rajiv
Rajiv
Vivek
Vivek
Amit
Step 5: Create a Unique Manager Collection
Add a Compose action.
Rename it:
Compose UniqueManagers
Inputs:
union(
    body('Select_ManagerNames'),
    body('Select_ManagerNames')
)
The result should conceptually become:
Rajiv
Vivek
Amit
instead of:
Rajiv
Rajiv
Rajiv
Vivek
Vivek
Amit
This is an important part of the design because the next step will process one manager at a time.
Step 6: Apply to Each Manager
Add an Apply to each action.
Rename it:
Apply to each Unique Manager
Select an output from previous steps:
Outputs('Compose_UniqueManagers')as the input.
The flow will now process the managers individually.
Conceptually:
Unique Managers
      ↓
Manager A
   ↓
Process KPI records

Manager B
   ↓
Process KPI records

Manager C
   ↓
Process KPI records
This design allows each manager to receive a separate consolidated email.
Step 7: Filter KPI Records for the Current Manager
Inside the Apply to each, add a Filter array action.
Rename it:
Filter ManagerRecords
From:
body('get_items')?['value']Edit in advance mode:
@equals(
    item()?['field_117'],
    items('Apply_to_each_Unique_Manager')
)
However, the production flow also needs the review-date condition so that only the KPI records due on the current day are included in the reminder.
Step 8: Select the Columns Required in the Email
Next, add another Select action.
Rename it:
Select EmailTableColumns
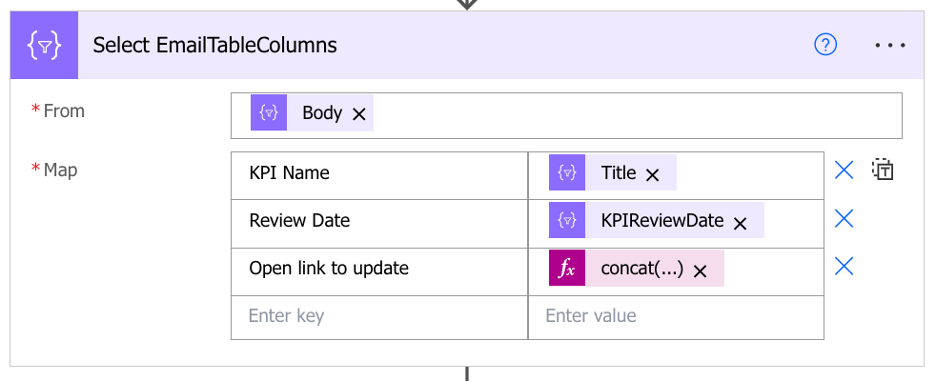
From: output('Filter_ManagerRecords')
Map:
Open link to update:
concat(
  decodeUriComponent('%3Ca%20href%3D%22'),
  'https://contoso.sharepoint.com/sites/DevSite/subsite/Lists/BT%20KPIs%20List%20Review%20Date%20Reminder/EditForm.aspx?ID=',
  string(item()?['ID']),
  decodeUriComponent('%22%20target%3D%22_blank%22%3EOpen%20Record%3C%2Fa%3E')
)
The production flow's Select action contains these presentation-oriented fields before the HTML table is generated.
This is better than directly exposing the entire SharePoint record.
The email should contain only information that the recipient actually needs.
Step 9: Generate CSS for the HTML Table
Add a Compose action.
Rename it:
Compose Table CSS
<style>
table {
  width: 100%;
  border-collapse: collapse;
  font-family: Arial, sans-serif;
  font-size: 14px;
}

th {
  background-color: #0078D4;
  color: #ffffff;
  padding: 10px;
  border: 1px solid #d9d9d9;
  text-align: left;
}

td {
  background-color: transparent;
  color: #333333;
  padding: 10px;
  border: 1px solid #d9d9d9;
  text-align: left;
}

a {
  color: #0563C1;
  text-decoration: underline;
  font-weight: 600;
}
</style>
This action contains the CSS used to style the generated HTML table.
For example, you can define styles for:
Table width
Header background
Header text
Cell padding
Borders
Font size
Links
The production flow contains a dedicated CSS composition step before generating the HTML table.
This separation is useful because the table-generation logic remains independent from the visual styling.
Step 10: Create the HTML Table
Add the Create HTML table action.
Rename it:
Create HTML table
From:
Output ('Select_EmailTableColumn')Columns:
Automaticas the input.
Set the table columns to the selected values.
The generated structure will be approximately:
<table>
    <tr>
        <th>KPI Name</th>
        <th>Review Date</th>
        <th>Open Link to Update</th>
    </tr>

    <tr>
        <td>KPI 1</td>
        <td>18-Sep-2026</td>
        <td>Open Record</td>
    </tr>
</table>
Step 11: Clean and Format the Generated HTML
After Create HTML table, add another Compose action.
Rename it:
Compose Clean HTML Table
Inputs:
replace(
  replace(
    replace(
      replace(
        body('Create_HTML_table'),
        '<',
        decodeUriComponent('%3C')
      ),
      '>',
      decodeUriComponent('%3E')
    ),
    '"',
    decodeUriComponent('%22')
  ),
  ''',
  decodeUriComponent('%27')
)
Use this action to combine the generated HTML table with your CSS and perform any required HTML replacement/cleanup.
This step is particularly useful because Power Automate's default HTML table output is functional but visually rather uninspiring. Humans have apparently decided that even automated reminders need interior design.
The production flow contains this additional HTML-cleaning/formatting step before the user lookup and email generation.
Step 12: Find the User's Email Address
Next, use the Microsoft 365 / Office 365 user lookup action:
Search for users (V2)
Search term:
Items('Apply_to_each_Unique_Manager')?['Value']Is search term required: Yes
The purpose is to find the email address of the manager currently being processed.
The flow can use the current manager information as the search input.
This is useful when the KPI list stores a person's name or identifier while the email action requires the user's email address.
The production flow includes Search for users (V2) followed by a Compose action for the manager email.
Step 13: Compose the Manager Email
Add a Compose action.
Rename it:
Compose ManagerEmail
Inputs:
if(
    empty(body('Search_for_users_(V2)')?['value']),
    '',
    coalesce(
        first(body('Search_for_users_(V2)')?['value'])?['mail'],
        first(body('Search_for_users_(V2)')?['value'])?['userPrincipalName']
    )
)
Use the result of the user lookup to obtain the email address that will receive the reminder.
The final email recipient is therefore determined dynamically.
There is no need to hard-code individual employee email addresses.
Step 14: Check Whether KPI Records Exist
Add a Condition.
Rename it:
Condition
Outputs('Compose_ManagerEmail')
is not equal to
"Live it blank"
The purpose of this condition is to verify whether there are records that actually need to be sent to the manager.
Conceptually:
Are there KPI records for this manager
        AND
Is the review date due today?
If the result is Yes, continue to the email action.
If the result is No, do nothing.
This prevents unnecessary emails.
Step 15: Send the Reminder Email
Inside the Yes branch, add:
Send an email (V2)
To:
Outputs('Compose_ManagerEmail')Subject:
DGEP KPI Updates - @{outputs('FormatDate')}Body:
<p>Hi @{items('Apply_to_each_Unique_Manager')?['Value']},</p>
<p>You are kindly requested to update your KPI details.</p>
@{outputs('Compose_Table_CSS')}
@{outputs('Compose_Clean_HTML_Table')}
<p>Please feel free to reach out to us for any issues or further clarifications at
<a href="mailto:HRContinuousImprovement@contoso.com">HRContinuousImprovement@contoso.com</a>.</p>
<p>Thanks for your ongoing efforts & support.</p>
<p>Best Regards,<br>
HR Team<br>The email body contains:
Greeting
Short reminder message
KPI HTML table
Direct links to the records
Support/contact information
Closing/signature
A typical structure is:
Hi [User],

You are kindly requested to update your KPI details.

| KPI Name | Review Date | Open Link   |
|----------|-------------|-------------|
| KPI 1    | 18-Sep-2026 | Open Record |
| KPI 4    | 18-Sep-2026 | Open Record |

Please feel free to reach out to us for any issues or further clarifications
at HRContinuousImprovement@contoso.com .

Regards,
HR Team
Click to view full architecture flow